My current 1957 Chevy Stock Car Project – Mon projet Stock Car Chevrolet 1957 en ce moment
*
*
*
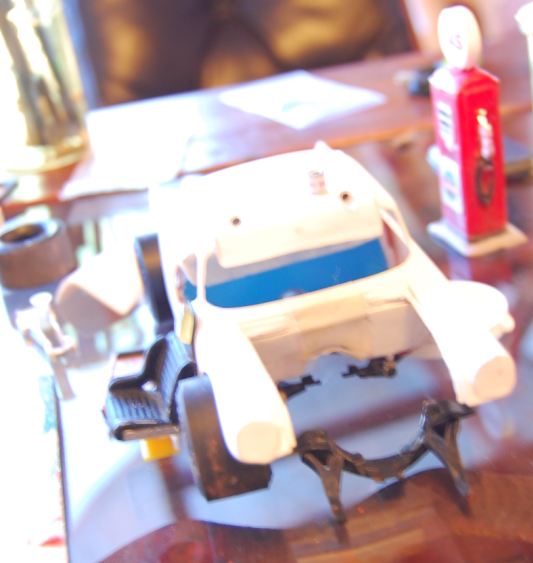
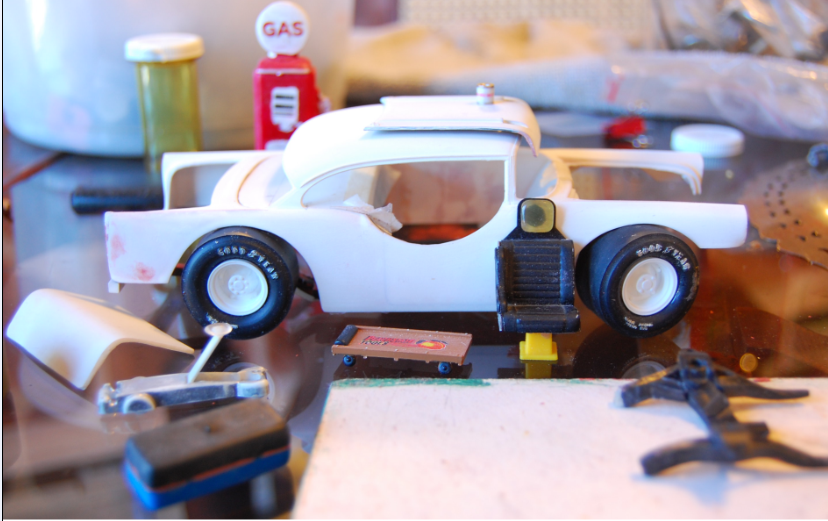
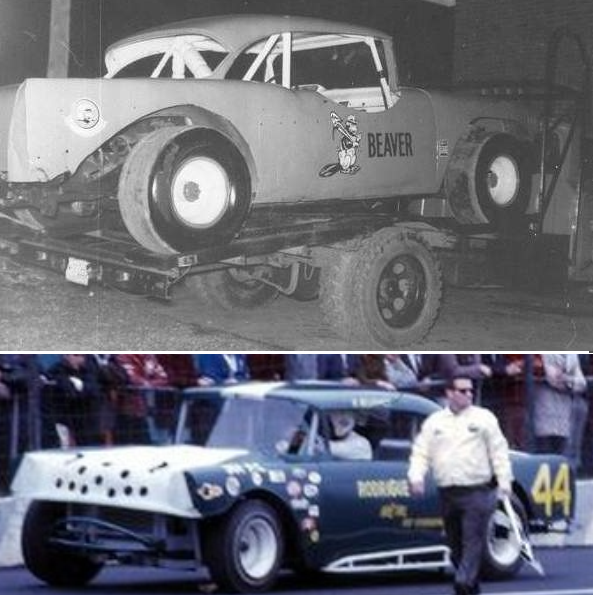
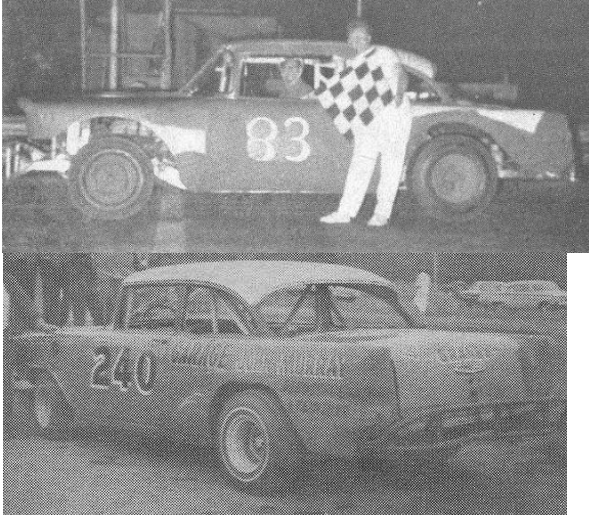
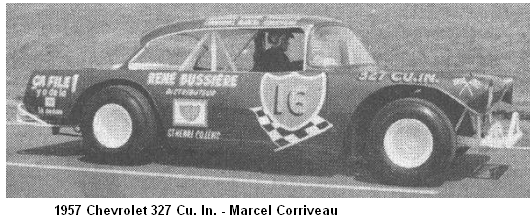
This is another crazy Stock Car project. It is going to depict the type of race cars running in the Late Model Sportsman division in the era 1968 around here. From around 1966 to 1968 in the province of Québec there was a fashion among some racers or car builders. Some of them were cutting the tips of the tail fins, mostly on the ’57 Chevrolets, but I suppose also on other models. They were also sometimes cutting the kind of shade over the headlights and were making the end of the fender flat at the front. I suppose that they were making it for 2 main reasons: The cars were easier to fix when they were smashing these areas. If you know a bit of body work, you have a good idea of how much work it takes to pop out and straighten a tail fin on a car like these ones, and you know all the work it takes to do the same kind of thing for the shape over the headlights on these models. A flat surface is a lot easier to fix. The second reason is simple. Removing a bit more of weight on the race car. I looked in my files and all over the Internet and found only a few pictures of Stock Car racers built this way, and they were all here in the province and here are some pictures :
*
*
*
*
I love these old Stock Car racers, because they are heavily modified with their wide cuts in the sheetmetal around the wheels, their tubbing bumpers, their crash bars on each sides, the openings that car builders were cutting in the upper part of the right or the left door panels to ease the access when the driver was climbing in or getting out of the race car. I love the way they were buit. I love to create and as none of these cars were exactly the same it gives me a lot of room for my own design if I want to create some bumper tubbing, my own rollcage shape, my type of headers or race parts and so much other details.
*
This project started life with an old version of the AMT ’57 Chevy (non ProShop). The body was in a junk box, it had been damaged by a fire and the roof was a bit crooked and slightly warped. I wanted to create a junker. A Stock Car racer that suffered a rollover. I had worked a lot on the model and finally I did not like the bent roof and did not want anymore to make a junker race car so I looked for another AMT, non ProShop ’57 Chevy body and I found only an old gluebomb that I had sanded and converted to a stock car (are you surprised of it?) and left it sleeping unfinished during a couple of years. I started over with this body. I sanded all the rest of the glue, cut the trunk lid open, sanded all the body moldings (on that one also), radiussed the wheel openings on the driver side (the other one was done already) and made some more cuts. I did not like the underside of the old AMT kit because of the molded exhaust system. As a Stock Car racer doesn’t have a regular hexaust system, but instead has headers (racing exhaust manifolds) and bigger extension pipes, I didn’t want to use the one from AMT because it is completely inapropriate for a Late Model Sportsman or a Modified Stocker race car. I found the underside of an old Revell kit, you know the one with the opening doors, hood and trunk lid. In the ’60s and ’70s, Revell was the only company that I know of making scale models with the 2 doors, the hood and the trunk lid, all opening, in the 1/25 scale market. The Revell kit had the floor pan and frame molded together, like the old AMT kit, but had the exhaust system apart, so I was willing to use it. If you are a very skilled modeler, you can cut the exhaust systems on the old AMT kit and fill the holes with some plastic, but you end up with floor lines missing and it could be a nigthmare to build these tiny lines from scratch. One day, maybe I would try, but not now. I do know that the new tooling ’57 Chevy ProShop from AMT has a separate frame, a very detailed floor pan, cowl dash and suspensions. I have a couple of these kits but I wasn’t willing to steele these parts from one of my kits and end up with a brand new body missing these parts. I know also that the Revell new tooling ’56 Chevy Delray has a very nice floor pan and frame and detailed suspensions and also the more recent release of the Revell ’57 Chevy 2 door sedan new tooling (Black Widow), I have all these kits, but wouldn’t steele any of their parts. It would break my heart, so I used the old Revell parts.
I was missint the hood. The one from the first kit was warped and bent from the fire, The one from the second one, the glue bomb, I couldn’t find it so in my junk box I had the Revell hood but I don’t like it because it is really not accurate. The 2 tunneled shapes for the hood ornaments are way too big for the scale. I had a couple of front clips from these old MPC ’57 Chevy flip nose gassers and these hoods were a lot more accurate. so I cut a hood from the 2 fenders and I filled the rectangular hole for the blower. It is not difficult as the ’57 Chevy hood is very flat and has no lines in the sheetmetal in the center of the hood. The flip nose hood was ok for the AMT kit, with little modifications, especially if you think that many builders were cutting the curved shape of the hood in the front to let some more airflow to the radiator and the carburetor. I used the firewall from the old Revell ’57 Chevy and I had to cut the one from the AMT, that in fact, was only a half of a firewall, and was combined to the front bottom part of the floor pan. Since I didn’t use this false floor the AMT firewall was missing some parts as on the other hand the revell one was a full piece and it was already matching its own floor and frame as they were from the same kit. I just had to adapt the top and sides to the AMT body.
*
This is me, I couldn’t use, like everybody, the parts from the same kit. I had to complicate my life again with some fool project, but this is me and what can I say? I am like that. I try something seeing some advantages but I end up with more problems to try to solve. What a crazy guy I am!
This is what happended, I ended up with big problems because the revell frame is longer than the AMT. I had to cut the frame under the back seat area and remove some material from the frame to allow the 2 curves at the back for the differential to be centered with the wheel openings of the AMT body. Cutting the 2 frame rails makes them weaker, so more work on the schedule for this area. The front part of the frame did not fit eighter and I had to cut it. I will have to make 2 spacers but I have to build a tubular cage in the engine bay and at the same time it will give some strength to the front part of the frame.
*
The race seat, if I am not mistaken, comes from the old Richard Petty’s ’64 Belvedere kit from Jo-Han, but I Installed a head rest plate and the head rest cushion on it. The extension plate behind the headrest cushion just fits and looks perfect. It was a part of a steel block off plate that we use behind a computer tower when we don’t install the optional electronic cards (graphic card, modem card, sound card and so on). Note that these electronic cards also use the same kind of plate, but they are perforated and have the outlets for connecting to the wirerings for the sound cards or other electronic cards. so if you have a defective one, keep the plate. There are many different models of tips on these plates, some are just perfect to make a headrest and some other ones are no good. I work part time in a computer store, so I have access to a lot of junk material or extra parts. Here are 2 pictures of one of these block off plates :
*

*
*
Well, we are now several weeks later and for the benefit of the interested ones, I just added the 2 following pictures showing plenty of different models of faceplates with more blabla about them.
*
*

*
*
*
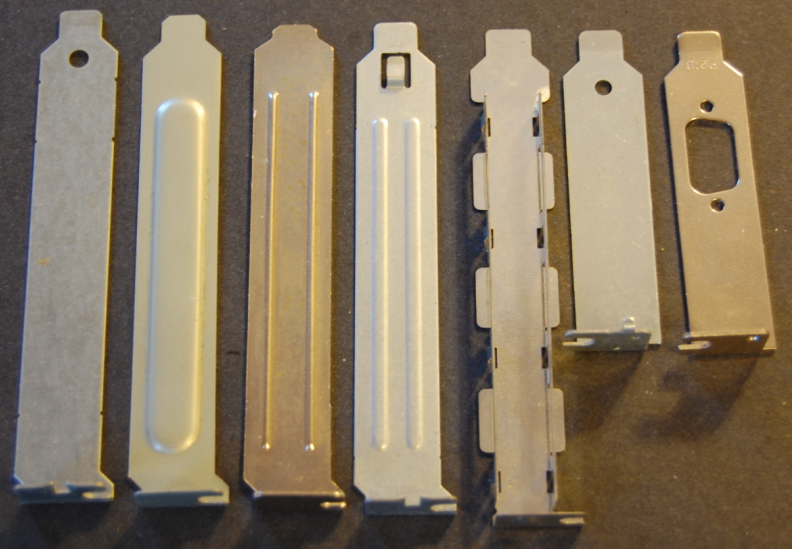
As you can see, there are many different models of computer faceplates used in the back of computers. The long ones come from regular computer towers and the short ones come from flat models of computers, more compact and low cost computers. The width of the plates are aproximatly the same width as a 1/25 scale race seat. As you can see from the pictures not all the models of these faceplates are suitable for a race seat, some plates have some kind of clips on their tip and can not be used, some other models have a very short tip, some other ones are made of plastic while some other plates are made of mesh. Some have corrogated designs and some others are completely flat. Some tips have round corners and some others have small angles. There is a wide array of different models and many of them could be used to build a nice head rest plate on a vintage race seat.
*
*
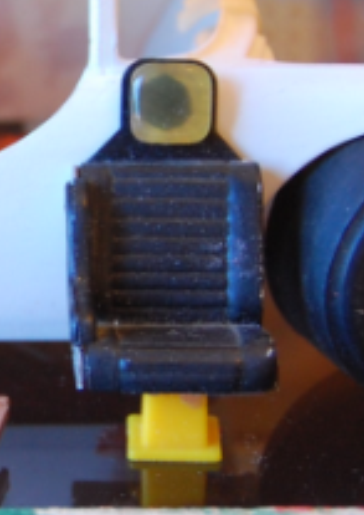
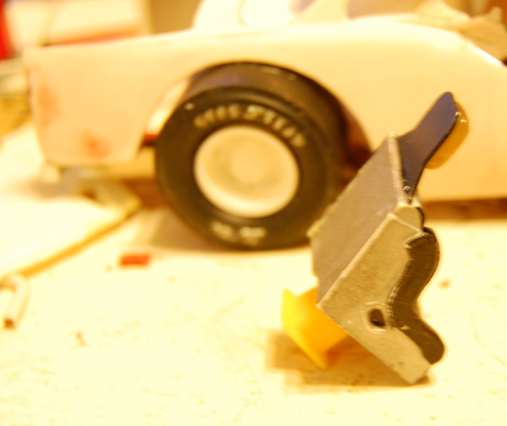
The cushion for the headrest is a quite funny story. I had boutht at the supermarket a box of muffins, you know the kind of thin plastic transparent box that is vacuum formed and when you want to crush it to put into your recycling box it makes a hell of a noise and it is not the kind of thing to do in the middle of the night when everybody is sleeping in the house, because if you do that they are all going to get up scared to death by the horrible noise, running away in all directions, forgetting to put their pants on and blowing off their bedroom doors and running outside. Don’t do that please. Don’t crush the thing because… you will need it. You see, I always inspect these wrappings because sometimes they have some very nice shapes in some areas. Some little round, or square cavities but with round corners. Very well done. Of course I am crazy, don’t even ask me if I have mental problems. It’s not my fault, I born like that.The trick is that you pour some fiberglass resin, or epoxy in these fragile shapes and when it hardens, you pop the thing out, or cut around it and it makes a very nice piece to put in your collection of parts. So this is the stupid story of this headrest cushion. This is where it comes from, no joke. And it fits just right PERFECT. No hard work, no frustrations, no bad words because you tried to fabricate the part with a square piece of plastic and you tried to round the 4 corners with a file and they don’t look the same. No crisis, no tear, no sulking, no menace to trow everything on the wall. It just fitted nicely together, the perfect match. I did take a couple of bigger pictures to show it better. I just sanded the back of my improvised cushion on a rough sanding paper to thin it to the desired thickness and that’s all. I am used to work a lot to adapt some pieces together but this little part of the project was just too easy (lol).
*
*
*

*
Ok, coming back about the seat, I also installed a kind of box with a floor plate moulded in, as an adapter or a spacer between the seat and the floor. I don’t remember where the yellow thing came from. Maybe it was a square button on some toy, I am not sure, but it fits perfect for this seat. Between this yellow piece and the seat I installed a ball of plastic paste that I squeezed with more pressure at the back, so it gave a slight angle to the seat toward the back of the car. I like this seat because it really has the look of this era. It is not narrow and tall like the Nascar seats of the 3 last decades. They are totally out of period for this old school racecar. You see, Nascar discontinued the ’57 Chevy model at the end of 1972, so how could you have more recent racing seats, or Nascar roll cage technology or Nascar racing chassis and suspensions with the 2 long angled arms at the differential, The adjustable coil spring suspensions (screw jacks) existed already in the ’60s and probably even in the ’50s if I think of what was writing Curtis “Crawfish” Crider in his book THE ROAD TO DAYTONA, where he talks about adjustable suspensions on race cars in the ’50s. I have seen these Screw Jack adjustable suspensions by the end of the ’60s and early ’70s and noticed that most of the time they were home made and not really difficult to build if you had an arc welding machine and a grinder. You could buy the treaded rods and nuts at hardware stores, a steel and iron supplier or you could get if from a welding shop. Now, a Late Model Sportsman race car was a sophisticated machine enough, even in these days. They were not “Street Stock” at all. Nobody would had run a car with a stock suspension in this division. It never would had been able to follow the other cars. There were some ways to modify and adjust the suspensions on cars with leaf springs in the back like the ’55-6-7 Chevrolets and many other models. They would play with the brackets and put shackles with different holes, and sometimes put shock absorbers with adjustable coils around them to help out the leaf springs with more pressure on one side. In these years people were running cars moslty with their original floor pans and original frames with modified suspensions, except unibody cars that ran or frame connectors to strengten their unibody raillings or were changing the bottom of their cars for full frames (and in many cases they were using also the floor panels that came with the frame), so some builders would install a shorten ’55-to ’57 Chevy frame and floorpan under a Chevy II, Nova of the early to mid ’60s, under a Corvair body or other models. Think about it. You only had to cut the floor pan along the rocker panels of the donor car, remove the bottom of the car and install the new floor with the frame under the body of your race car, and you could use also the firewall that came with the floor and the frame if wanted. You only had to weld along the rocker panels and adapt the front of the floor to the firewall, or the sides and the upper part of the firewall if you used the one coming with the floor and the frame. These race cars, unlike the Grand National division cars, had no floor panels in the trunk area, so not much work needed over there. Welding the frame at the end of the trunk and a couple of rods on the sides of the frame to the bottom of the quarter panel sheetmetals to prevent them from flapping at the wind. I knew an ex Stock Car racer who told me about these swaps more than 30 years ago. He was talking about racing cars in the ’60s and early ’70s. This guy was also a hot rod builder and a very good mechanic.
I have been discussing about mechanics and all kind of modifications with guys like that when I was younger and looked at so many of these race cars in all kind of angles in these days, and still I get more and more documented since we have Internet. I was a Stock Car nuts and still I love these machines of the good ole days. I don’t like the Stock Cars and Supertrucks of the last 3 decandes. They have no style and they look all the same. In the 80s when car builders in the Modified division started to replace car bodies by pieces of sheetmetal, the cars became very ugly with no style at all. They looked (and still look) like what they are : tinsmith boxes on wheels. What do you think of this? There is absolutely nothing left from a street car (stock car), and they still call it stock car !!!!!
*
There is still a lot of work to do on this project and I want to create a diorama so I have a couple of figurines already started and one of them almost finished for this race car diorama, and plenty of tools also. Beside this, I also work on plenty of little projects of diorama items. If I could have all my time, 24 hands and 12 brains (boy, I would be ugly though) it would work a lot faster (lol).
Florent
Any comment? Question? You would like to post some pictures or your work, your projects in construction?
Feel free to contact me.
My email address :
florent@montrealminiatures.com


