Graphic art – Creation of a retro car for vintage advertising of some sort
*
Please click on the image to see it full scale
*
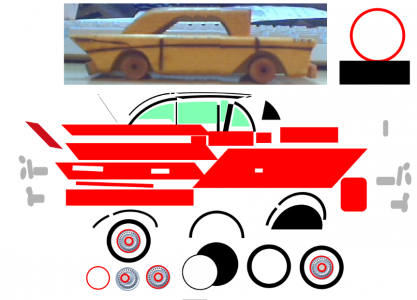
I had bought this little wood car that we see on the picture above. I liked the look. It was inspiring me to make a drawing of it in my vector graphic program.
Under the picture of the little wood car, you see all the parts that I have crafted to make this ”drawing”. Vector graphic is something so particular in a sense that it is really not like the conventional way to make drawings with a pencil or a brush. It is building parts seperatly and assembling them one to the other, then building another one, making the adjustments and fit it to the ones that have been already assembled. It is a bit like building a scale model kit, or like the consctuction of the little wood car made of al kinds of little wood parts crafted seperatly, then making fit tests and reworking the part till it fits perfectly, then gluing it to what has been done up to date. I had to learn it by my own and this is the way I build my vertor drawings. Nobody around could teach me how to use the tools of the software, so I had to find a way to become able to figure out how to use the different tools of the software… It took a long time and some way, I found ways to be able to create interesting things with the techniques that I found with the time.
*
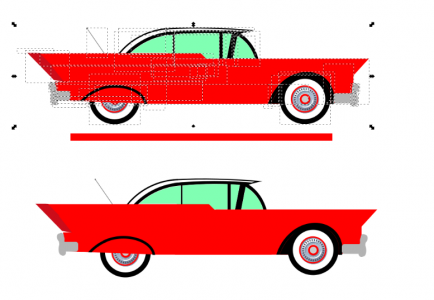
In fact, about the car on the picture, I had assembled all the thing and made a second copy of it, then I took all the parts away to give an idea of what it could look all desasembled. It is really not the conventional way to make a drawing. All the tools are in the computer and we have to use them one by one in the process to build our parts. Further adjustments are always possible and desasembling something built is possible too, very easily.
*
The wood car has been my inspiration but for the roof I took inspiration on other styles of vintage cars, including green tinted glasses.
*
*
The dotted lines are showing all the different parts assembled on the car. The red bar between the 2 cars was my movable guideline used to adjust the front and the back wheel at the same level. Then it was removed.
On the last picture, I had pressed on the icon (tool) that we use when we want to ”group” all the parts in one piece (it makes me think of the tube of glue that we use to bond all the parts together on a scale model kit. The process can be also inverted at any time if needed in the software. Not as easy to do on a 3D scale model kit when all the parts are glued together.
*
Any question or comment?
Please feel free to contact me.
florent@montrealminiatures.com


